Deploy an app to multiple subdomains on Cloudflare Workers
/ 5 min read
Table of Contents
What Are We Building?
In this guide we will purchase a custom domain from the Cloudflare Registrar and use it to host a web application on the Cloudflare Workers serverless compute platform.
We’ll configure the application to be deployed on separate environments each with their own subdomain.
Lastly, we will set up CICD on each domain via Git integration, where each Worker will have it’s own Git branch that will trigger an automatic deployment when new commits are pushed to GitHub.
Refer to the following table for a summary.
| Domain | Worker Name | Git Branch |
|---|---|---|
| dev.my-domain.com | my-tanstack-start-app-development | dev |
| staging.my-domain.com | my-tanstack-start-app-staging | staging |
| prod.my-domain.com | my-tanstack-start-app-production | main |
Get Your Domain
Head over to the Cloudflare Domain Registrar and purchase your domain. We’ll assume for this guide it’s my-domain.com.
Initialize Your Web Application
Visit the framework guides and choose your web application framework. For this guide we’ll use Tanstack Start.
pnpm create cloudflare@latest my-tanstack-start-app --framework=tanstack-startConfigure Your Subdomains By Environment
Your app will come scaffolded with a minimal wrangler.jsonc file. Edit this file to configure your custom subdomain deployments.
{ "$schema": "node_modules/wrangler/config-schema.json", "name": "my-tanstack-start-app", "compatibility_date": "2025-09-02", "compatibility_flags": [ "nodejs_compat" ], "main": "@tanstack/react-start/server-entry", "observability": { "enabled": true }, "env": { "development": { "routes": [ { "pattern": "dev.my-domain.com", "custom_domain": true } ] }, "staging": { "routes": [ { "pattern": "staging.my-domain.com", "custom_domain": true } ] }, "production": { "routes": [ { "pattern": "prod.my-domain.com", "custom_domain": true } ] } }}Deploy To Each Environment
TanStack Start uses the Cloudflare Vite Plugin which helps integrate Vite applications with the Cloudflare Workers runtime. It utilizes the new Vite Environments API.
To deploy your application to each environment, run the following commands from the command line:
CLOUDFLARE_ENV=development pnpm run build && pnpm dlx wrangler deployCLOUDFLARE_ENV=staging pnpm run build && pnpm dlx wrangler deployCLOUDFLARE_ENV=production pnpm run build && pnpm dlx wrangler deployYou can revise the node scripts of your package.json if you like.
{ "name": "my-tanstack-start-app", "private": true, "type": "module", "scripts": { "dev": "vite dev --port 3000", "build": "vite build", "serve": "vite preview", "test": "vitest run", "deploy": "pnpm run build && wrangler deploy", "deploy:dev": "CLOUDFLARE_ENV=development pnpm run build && wrangler deploy", "deploy:staging": "CLOUDFLARE_ENV=staging pnpm run build && wrangler deploy", "deploy:prod": "CLOUDFLARE_ENV=production pnpm run build && wrangler deploy", "preview": "pnpm run build && vite preview", "cf-typegen": "wrangler types" }, // ...rest of package.json}This will deploy three separate Cloudflare Workers applications to your account.
The name of each worker will be the top level name field in your Wrangler file, suffixed with the environment name.
my-tanstack-start-app-developmentmy-tanstack-start-app-stagingmy-tanstack-start-app-production
Each Worker will be accessible on the domain configured in the Wrangler file.
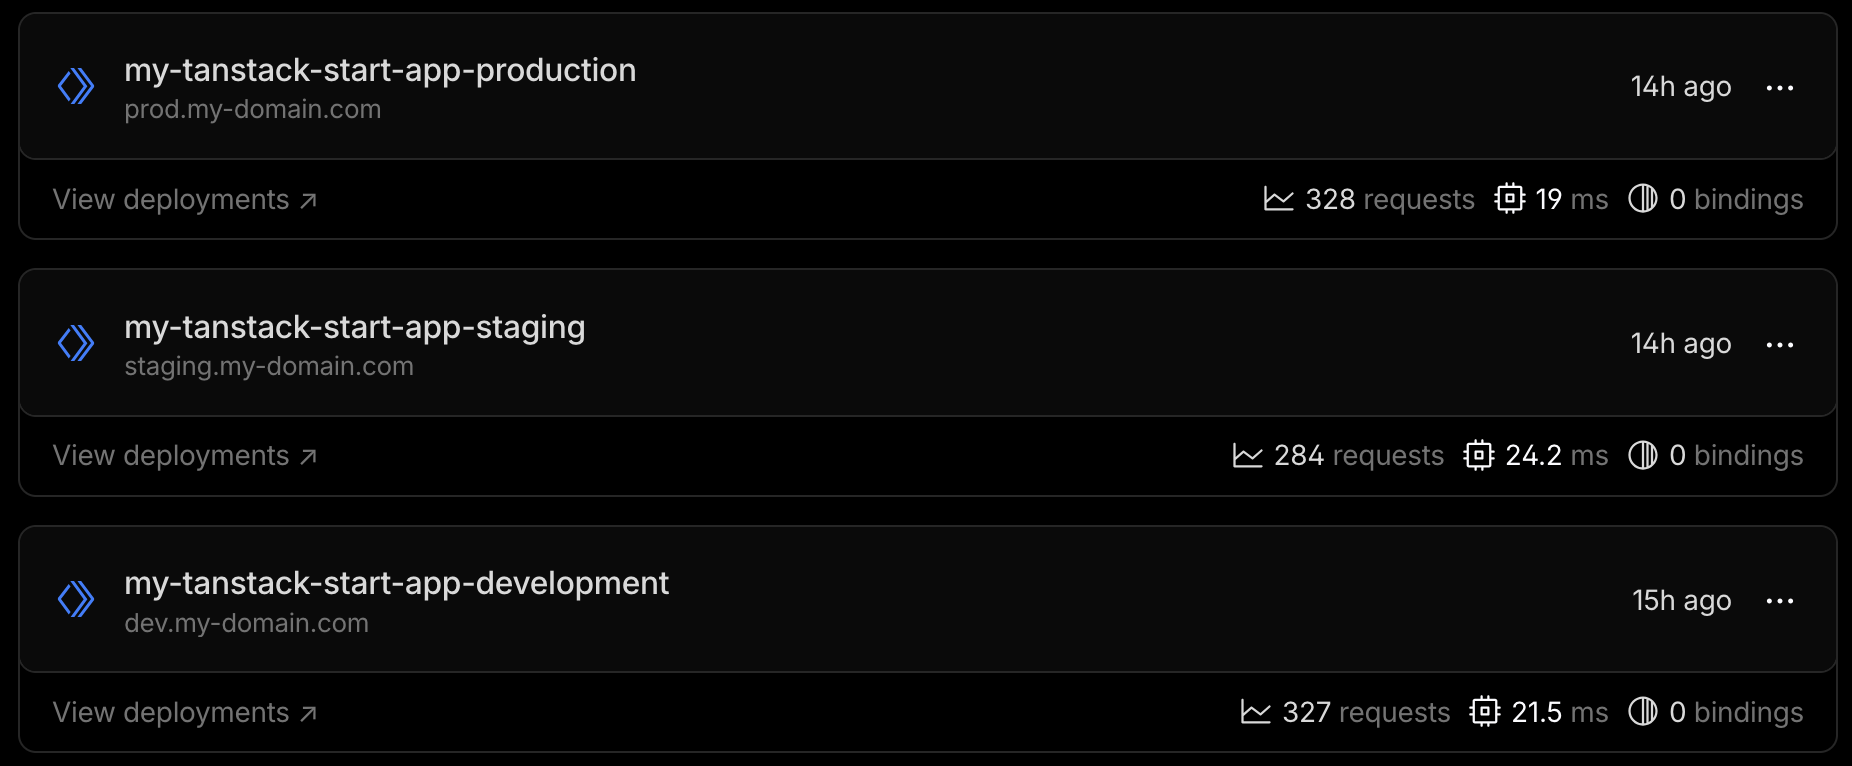
Read more about Cloudflare Workers Environments.
Configure Git Integration
In the Cloudflare Workers platform, each environment uses it’s own Worker. And therefore each Worker will have it’s own “production branch”.
At the time of writing, Git integration cannot be done through the Wrangler file. So we must visit the Cloudflare developer dashboard.
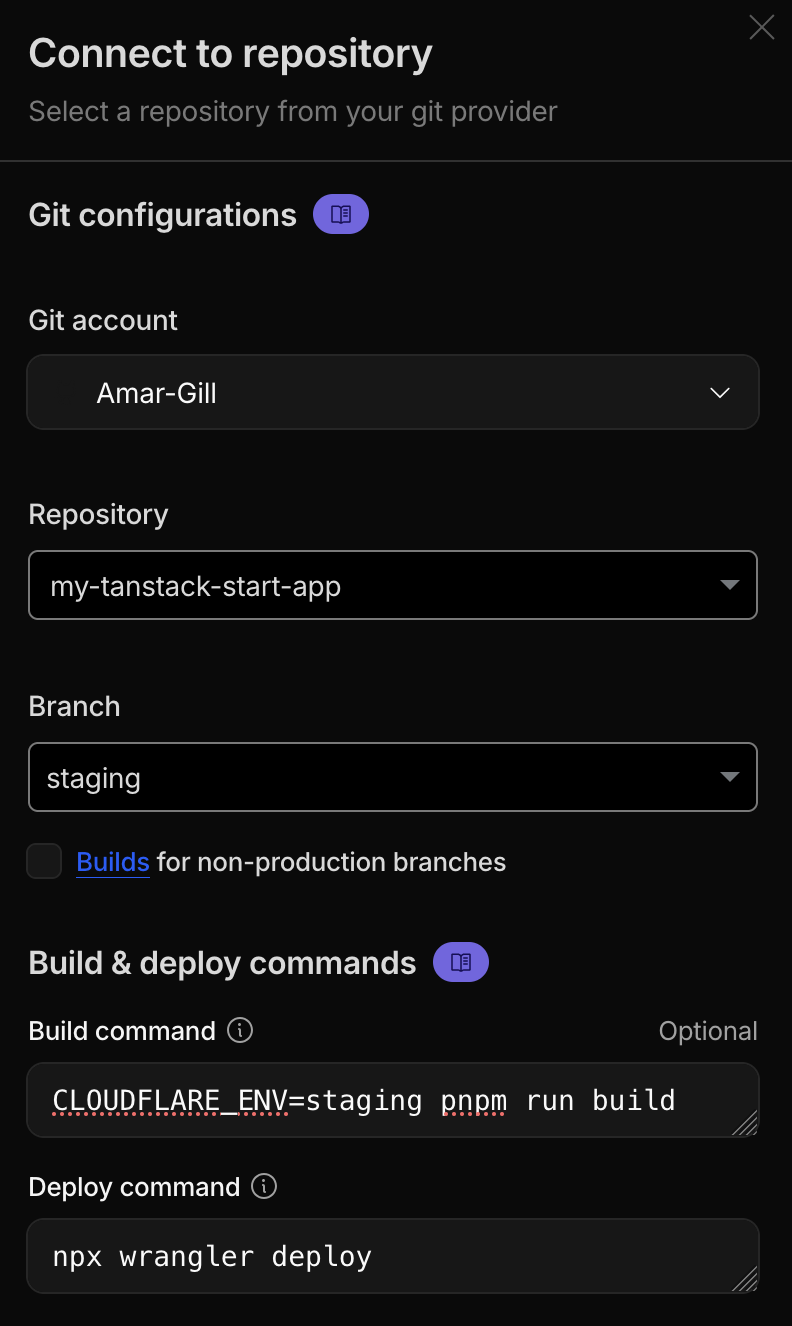
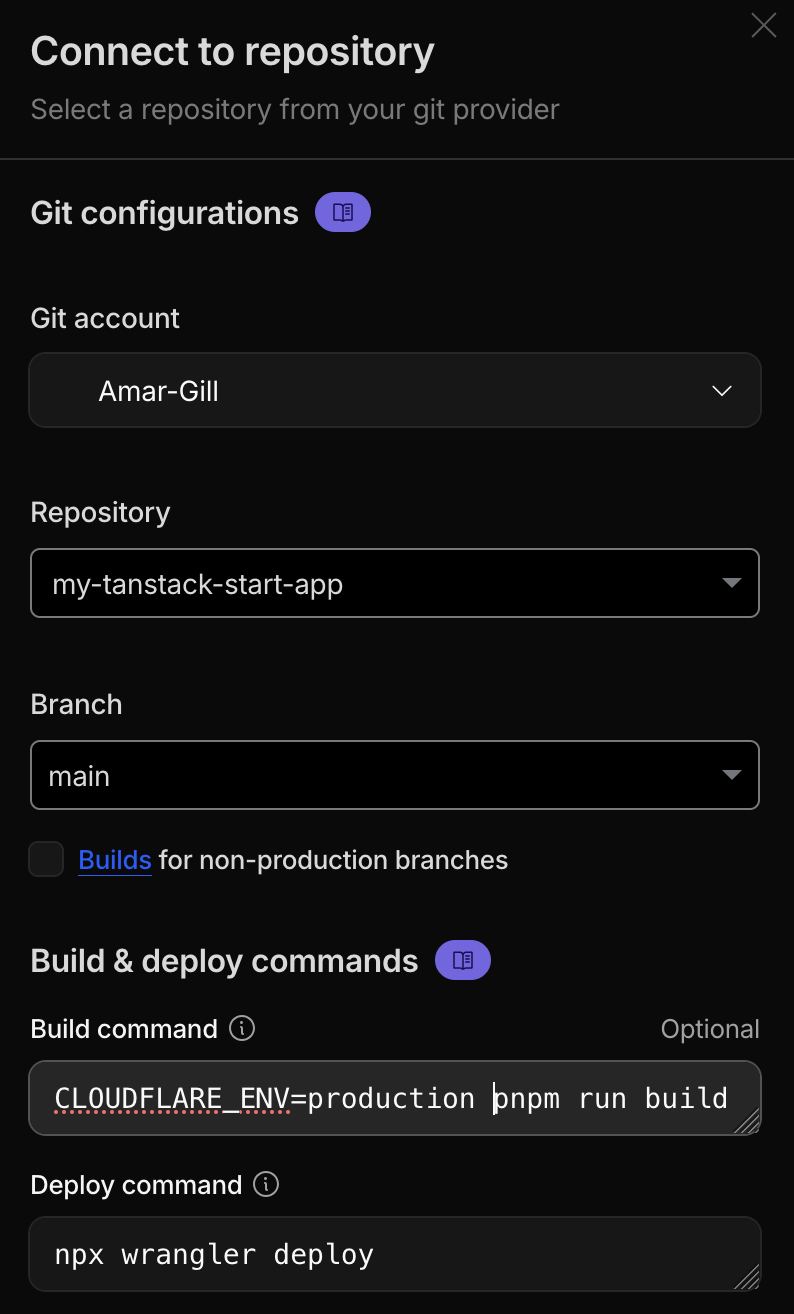
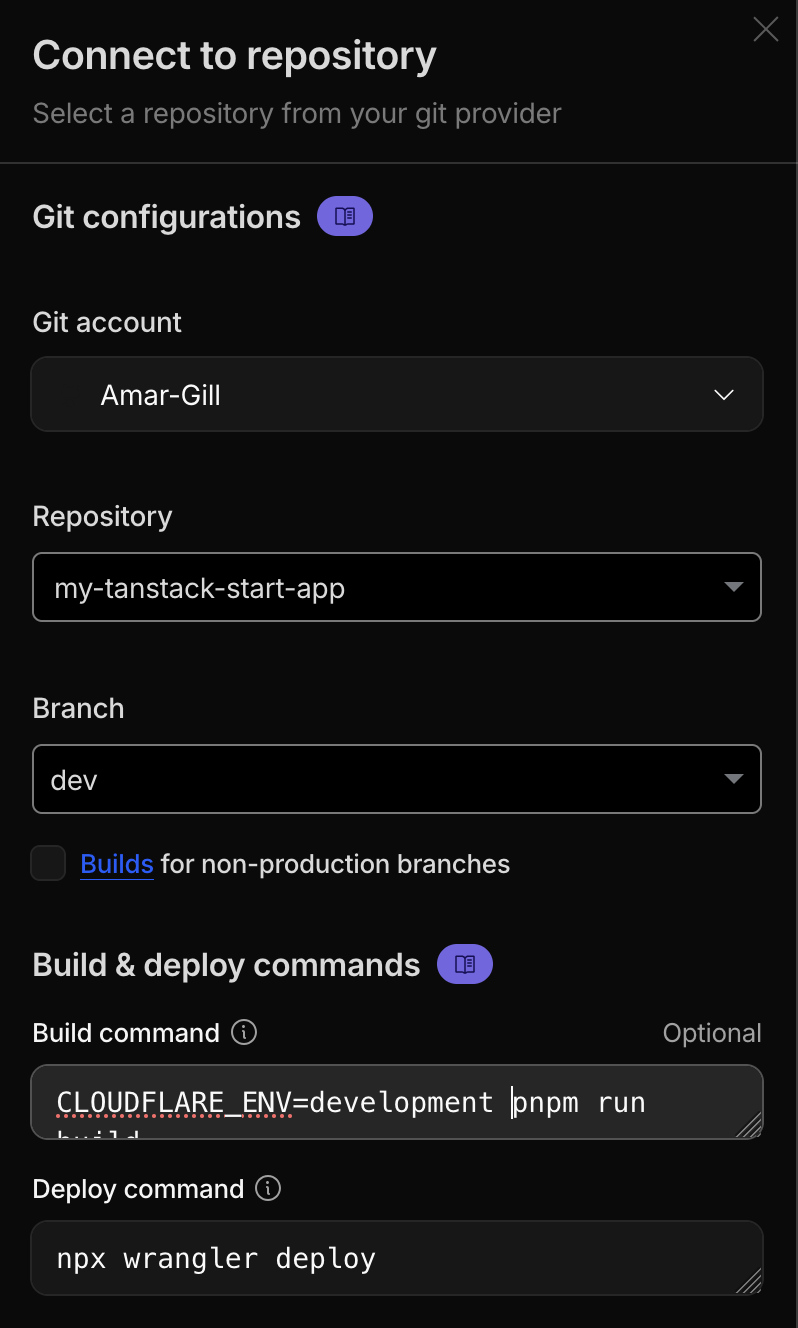
Under the Worker settings page, look under the Build section to connect your Git repository. In the set up you can specify which branch is the “production branch” for each Worker. And then you can update the build command to use the appropriate environment from your Wrangler file.
| Worker | Branch | Build Command | Deploy Command |
|---|---|---|---|
| my-tanstack-start-app-production | main | CLOUDFLARE_ENV=production pnpm run build | npx wrangler deploy |
| my-tanstack-start-app-staging | staging | CLOUDFLARE_ENV=staging pnpm run build | npx wrangler deploy |
| my-tanstack-start-app-development | dev | CLOUDFLARE_ENV=development pnpm run build | npx wrangler deploy |
Read more about Cloudflare Workers Git Integration.
Going Further With Bindings and Vars
With your separate Worker environments set up now, you can add environment variables and Cloudflare infrastructure bindings that are unique to each environment.
In the following example, we add a unique VITE_APP_NAME environment variable and provision a unique R2 storage bucket to each Worker with our Wrangler configuration.
The environment variables and storage buckets will be provisioned automatically once you push the wrangler.jsonc change to the remote repository and the automatic build completes.
Read more about configuring Wrangler.
{ "$schema": "node_modules/wrangler/config-schema.json", "name": "my-tanstack-start-app", "compatibility_date": "2025-09-02", "compatibility_flags": [ "nodejs_compat" ], "main": "@tanstack/react-start/server-entry", "observability": { "enabled": true }, "env": { "development": { "routes": [ { "pattern": "dev.my-domain.com", "custom_domain": true } ], "vars": { "VITE_APP_NAME": "My Tanstack Start App Development" }, "r2_buckets": [ { "binding": "STORAGE_BUCKET", "bucket_name": "dev-bucket" } ] }, "staging": { "routes": [ { "pattern": "staging.my-domain.com", "custom_domain": true } ], "vars": { "VITE_APP_NAME": "My Tanstack Start App Staging" }, "r2_buckets": [ { "binding": "STORAGE_BUCKET", "bucket_name": "staging-bucket" } ] }, "production": { "routes": [ { "pattern": "prod.my-domain.com", "custom_domain": true } ], "vars": { "VITE_APP_NAME": "My Tanstack Start App Production" }, "r2_buckets": [ { "binding": "STORAGE_BUCKET", "bucket_name": "prod-bucket" } ] } }}Conclusion
The Cloudflare Workers platform is powerful serverless compute platform, that allows for declarative infrastructure provisioning with Wrangler.
When you purchase your domain through the Cloudflare registrar, you can set up subdomains on separate environments for your full stack app as we have shown. This is useful when launching a SaaS product where you need separate production and staging environments.